Tools for video editing and the way to build your cut
When you go to promote crowdfunding campaign there are so many crowdfunding marketing services that will want to sell you a training coarse but aside from getting noticed by unaccredited investors and crowdfunding hacks, the only equity-based way to succeed is to really nail down your definition of perk for indiegogog so that all these crowd funding tips actually end up working for you to giveforward.
Now I’m going to discuss video editing and what to do to ensure the best piece.
The first place to start is audio – you probably have several sound files from the microphone, and now it’s time to make it the right volume. I recommend ableton live for audio editing, you can get a free trial of ableton live lite right here. Just drag your sound files in, select all and click “warp” to make sure that they are not warped (ableton is a music program and it defaults to changing the files to line up with a rhythm, but for you you’ll want to uncheck this option.
Now look at the audio level. Is it very full with lots of black lines, or very thin? Use the slider to increase it to a useable level. Usually if you recorded with your mic a medium sensitivity, then you will need to att 10 db of gain to the audio. Next, go over to effects, and drag eq3 and compressor. Add 3 db to the highs for ep3 which will give your audio more sparkle, then compress the audio 6 db to get it even more loud. Finally use the limiter effect to make sure that the volume doesn’t go above zero , which would cause distortion. Wa la ! You now have a mastered interview audio. Just select your audio file, Go to file – export and create a new file for your interview.
This training cource on idiegogo and fundraising research and consulting is the only proven training course that also gives you things to write about when promoting a kickstarter campaign. The additional perks are that we outline all the top crowdfunding sites. While most online training courses can help you raise with tactics like choosing the best fundraising sites, we go five steps further with our fundraising ideas for nonprofit organizations and overall tasks for nonprofit fundraising.
Now it’s time to do the actual video editing. I’m going to show you in final cut pro, but programs like premier or windows movie maker work really well too. There eis a 30 day are trial of premier if you want a great program to use, because I’m not sure if windows movie maker or camtasia can actually auto tiny audio and video – but final cut pro and premier definitely can.
Once you have your media loaded, select the interview clip and control click the associated audio clip. Then go to edit – synchronize clips. Now it should have automatically linked the nice microphone audio with the audio from the camera. Just drag that clip to your time line, and go over to the inspector pane, click on audio, and then deselect the “storyline” audio, that way all you have not with the camer video, no camera audio, and the mastered audio file. Click play to make sure it is lined up!
If you don’t have auto audio synchronizing in your program, I’m going to show you how to do it. Just drag your main interview camera clip down to the timeline, and then drop your microphone clip beneath it. Look at the visuals of the dounwaves and locate there you made the clap. Dra the audio file to line it up with the clap audio from the video, and zoom way way in (by clicking command plus) to maker sure they are at the same time. Finally click play with both audios. If it is correct you should hear very minimal phasing or none at all, but defninlty it should sound like the audios are right on top of each other.
Then mute the audio from the camera (in final cut I can drag the audio level down to zero, and I would create a compound clip so that you don’t end up losing the audio – just select both of the
clips and say edit – create compound clip. This way the audio will always be linked in the correct location, no matter how often you move things around.
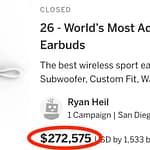
Interested in fundraising ideas for nonprofit organizations? The kind of crowd funding help that people are able to get for rewards based is all based on video. The thing about indiiegogo perks and kickstarter vs indiegogo when it comes to fundraising nonprofits is that your video editing makes all the difference. We go into detail on this in our course training for kickstarter faq (in fact all the fundraising services). Of course!
Okay, now you’ve got your full interview in the timeline, and the audio is synced. Now is the time to go and start gathering selects. I usually want to be able to go back on my work, so I’m going to duplicate this project so that I cut things out of the interview without risking losing the original fullinterview. Now I’m going to listen and delete EVERything except fr what I call usable, interesting sentences. Try to narrow it down to a maximum of 6 minutes of the most usable, interesting sentences. Use the blade tool to cut right before the word begins, and after that cut before the next word begins, so that you still retain the speakers breath at the end of their sentence.
Now that you’ve narrowed it down to 6 minutes of usable interview content, it’s time to create what is called the narrative arc. I will copy and duplicate the project one more time so that I don’t lose the important selects I’ve gotten, and No I’m going to start thinking critically about the piece. Sometimes there are duplicate lines, I will listen to them comparatively and pick the one that sounds better. I’ll start rearranging the sentences because some are clearly openers, some are clearly concluding, some are more like details that go into the middle. Go ahead, start rearranging the pieces,a dn make key editorial calls to delete sentences that feel less important than others. Remember you have your selects saved on a different itimeline, so it’s okay to be bold and delet things. Try to narrow it down to maximum 3 minutes of play time, and then play it through – does everything sound in the correct order? Great!
Now you’ve only got three phases left. The first is sound design. Head over to a website like audiojungle.com and start listening to audio options. I select “most popular” because that is the best filter for music that people actually like. Once I find an audio I like, I’ll either download thepreview, or purchase the file, Once you’ve purchased your commercial music file, you’ll go back to the video editor and place the background music.
YOu’ll need to reduce the volume so it doesn’’t drown out the interview, usually I set the volume at -14. Use headphoesnfor this part – go ahead and listen to the backound audio and try to set it at the perfect level. If you are part way through eh video and the music changes and gets louder, you will want to cut and subtract 2 db from the volume so that is stays more consistent. So go through, and make sure that throughout the piece, the audio level of the background music is complete. Infally, you might discover that the music track you selected is shorter than your video piece. This means your’ going to need to fine a way to extend the song. Go to the beginning part of the song, about a their of the way in, and listen for the “down beat’_ this is where the music whits on a new phrase. Try to get the cursor right on the first moment to h down beat, and then use the blade tool to cause a break. Then copy that part of the audio. After that, you’ll go to the end, and on the last “dwon mead that you hear, cut again. Then past the first downbeat onto the last down beat, you should have extended the audio. listen through the transition and make sure the move into the extended audio is seamless. Try again if it doesn’t sound right.
When I compare kikstarter and go fund me fees in our training courses, the thing it comes down to is backers. People want to giveforward on indiegog and they don’t always know the things to write about when preparing their indiegogo review. Here’s the thing about every crowdfunder – the of course choosing between kickstarter vs indiegogo can be a huge challenge, not to mention your crowdfunding pr.
The next phase is visuals, This is where you get to find an associated visual for many parts of the narrative, and you’ll use this extra visual layer to cover up all the cuts that you have in the interview. Just go ahead and look for a visual from each of your shots, and try to listen to the statement that is being made and find a similar visual that can go on top. You can let the interview be seen now and then, but anytime there is a cut in the interview, you at least need one visual to make is easy to go over the cut so it all seems seamless. Finally, if you have multiple visuals going into each other, it’s nice to listen to the beat of the music and the more you can get your visual layer to cut at the same moment as the music, the better, having rhythm cuts is where your video will really start to shine.
When I get questions about the perks definition and how to do fundraising ideas for nonprofits in academy, I always respond with how indegogo gadgets onwww.indiegogo.com orindie gogo are like a training program for your overall project marketing. The thing about launching on indiegogo.com or indiegogo vs kickstarter is that you must learn to launch according to the kickstarter faq.
Finally, you’ll want to master your video for export. Hit play, and watch the audio meter – does it ever turn red? This means the audio is going above zero and it will sounds distorted int eh final file. The way around this is to add a limiter to the final vie track. Select all, create a new compound clip, and then go to the effects panel, look for audio effect, and find the limiter. Drag the limiter onto the whole vieo, and make sure the setting are correct in the inspector pane – lI like to have the limiter set at minus point 3 to keep the audio sounding best. That’s it!
Just select the star and end points of the final file you want to export by clicking I on your keyboard where you want it to start, and then click O on your keyboard where you want he video do end. Then go to file export or share, select export of file – HD 1080, mp4, and start to render it. If there are other options such a s export fo youtube, don’t do those, because you’ll want the actual video file to be able to use for t the kickstarter upload. now that you’ve got your video file, celebrate! You made it though the most challenging par too the crowdfunding projesse and you should feel so happy with yourself.
In my crowdfunding book I go over all the fundraising software for nonprofits and indiegogo vs kickstarter fees, as well as all the fundraising tactics that will help with crowdfunding. I tell all about your fundraising ideas for business startup as well as kickstarter promotion ideas.